¶ Field View Tab
The field view tab is where users can plan which crops they will plant in which years, one field at a time. It can also be used to create management templates, plan nutrient applications, calculate soil loss and configure crop rotations.
¶ Choosing a Field
At the top of the page are three drop-down menus:

- From the Field menu, select the field where you'd like to plan your crops. Either select a field or navigate between fields using the arrows.
- Use the group and subfarm menus you can filter the options available in the Field menu.
¶ Editing and Saving Crop Data
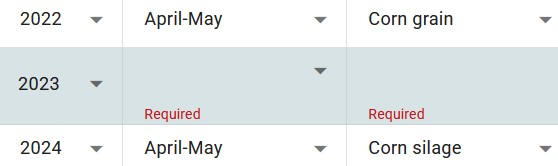
Crop data is represented in a data table. An empty field will come loaded with one empty crop of data:

Crop data must be set in a specific order:
- Choose a season, narrowing the list of possible crops.
- Choose a crop, determine the options for yield and tillage.
- Choose a yield and tillage in any order.
If only one option is available in a given menu, that option will be assigned automatically.
¶ Validation Issues
To most accurately and precisely predict soil loss, only some combinations of season, crop, yield and tillage may be entered into a SnapPlus database. Sometimes, there may be issues with a value chosen:

There are also constraints applied based on problems with seeding or tillage between crops:

¶ Error Messages
- "This crop's fall tillage overlaps with the previous crop's planting."
- Possible solutions: change the tillage on the offending crop. Remove or modify the preceding crop so that there is no fall-planted crop before the crop that is fall-tilled.
- “This crop requires a seeding crop.”
- Possible solutions: change the established crop to a non-Established crop, change the preceding crop to a seeding crop, insert a seeding crop after the preceding crop/before the established crop. This error will likely display on plans converted from SnapPlus 2, because in V3, established crops must be seeded. In that case, it may make sense to change the established crop into a seeding crop.
- “This crop is planted at the same time as the previous crop.”
- Possible solutions: delete one of the two crops that are planted at the same time. This error may show up in converted V2 plans.
¶ Two week operation date overlap
Sometimes the data in a nutrient management plan needs some extra preprocessing to serve as input for soil loss modeling (and so, to calculate soil loss). One common situation is that crop data is set up in a plan where the dates of operations (planting, cutting, tilling etc.) don't exactly match the dates that are assumed by soil loss models. In this case, SnapPlus will display a message when the data is saved:

¶ Adding Crops to a Sequence
Below the rotation settings and field selection drop-down, there are a few buttons available corresponding to controls that can be used to create crop sequence data on fields:

¶ + New crop
This button will also insert a row below the active crop,. This button is only available if there is an active crop selected. Some data will be automatically assigned on clicking this button:
- Calendar year: the year after the active crop's calendar year, unless the active crop is perennial seeding and fall planted, in which case the year will default to two years after the active crop's calendar year.
- Other crops: If the active crop is not the last crop in the sequence, the crops following the active crop will have some data changed automatically by SnapPlus. Every row that is below the newly inserted crop row will have 1 year added to its calendar year property, as in the example below:

|
|
¶ + Add crop same year
This will insert a row in the same calendar year as the currently selected crop. Using the above example, pressing this button with 2022 April May Corn grain selected will create a row for a new crop planted in 2022.
- Calendar year: this value will either be the same or one greater than the value in the calendar year column of the crop in the row above. The year will be the same as the crop in the row above if the crop in the row above is planted in the April-May, June, Mid-Summer or Established season. The year will be the calendar year after the crop in the row above if the crop in the row above is planted in Late Summer-Fall.
- Plant season: this value will be the first planting season following the the planting season of the crop in the row above, and before the planting season of the crop in the row below (if there is any).
This button is a button dropdown, meaning that clicking the arrow on the right side will display a menu with additional options:
- + add crop at beginning of sequence will automatically create a crop in the calendar year before the current first calendar year in your crop sequence.
- Example: if the first row in the table has calendar year 2025, adding a crop to the beginning of the sequence will put a row on the top of the table in calendar year 2024
- + add crop at end of sequence will automatically create a crop in the calendar year after the current last calendar year in your crop sequence.
- Example: if the bottom row in the table has calendar year 2028, adding a crop to the beginning of the sequence will put a row on the bottom of the table in calendar year 2029
¶ Duplicate Crop
- The duplicate crop button is available if there is an active crop. Use the duplicate to select a position in the sequence and then insert a copy of the current active crop (highlighted row) to that position in the sequence, following the same rules above. Applications will also be copied.
- Note: if duplicating a fall-planted seeding crop to the end of the crop sequence, the crop's year will be assigned differently depending on the current final crop in the sequence:
- If the last crop in the sequence is fall-planted, the duplicated crop will take the calendar year after that crop.
- Otherwise, the duplicated crop will take the same calendar year as the last crop in the sequence, but start the next crop year.
¶ Templates
Templates can be used in the field view. More information is available on the template builder page.
¶ Undo
Changes to crop data may be undone one modification at a time using the undo button.
¶ Deleting a Crop from the Sequence
Crop data on a field may be removed from a plan by clicking on the trash can icon in the rightmost column of the table. If necessary, SnapPlus will automatically adjust the value for the ‘year’ property of a crop that is deleted if that crop is planned between two crop in consecutive years. In the below example, a crop is deleted in the middle of a sequence of three crops:
|

|
¶ Rotation Settings
Once some crop data has been saved to the field, new rotation settings will become available:

Certain limitations apply to the possible lengths of a crop rotation:
- Crop rotations can be at most eight (8) crop years in length
- On 590 farms, a rotation must be at least three (3) years in length
- On CAFO farms, a rotation must be at least five (5) years in length
Once rotation settings on a field have been configured, click on calculate erosion to generate soil loss predictions and P index estimates for that field. If data for crops within the rotation is modified, all predicted erosion and P Index results for the field will be cleared automatically. SnapPlus may block a user from calculating soil less estimates on a field if there are issues with crop or application data contained in the rotation (more details in later section)
Field practices (contouring and filter areas) can be set up even if there are no crops on the field.
SnapPlus considers a rotation a repeated cycle of a set of crops on a field. So, when checking if soil loss estimates can be calculated on a rotation of crops, SnapPlus will compare the last crop in the rotation to the first crop in the rotation. If the first crop in the rotation cannot be planted after the last crop according to the rules outlined above, the rotation is considered invalid. For example:
- If the rotation begins on, or includes, established crops that are not seeded. There is sometimes not enough historic cropping data to correctly represent fields that have been seeded for a long time, so there are two exceptions:
- The rotation includes only established crops
- The rotation is the maximum rotation length of 8 years
- If the rotation begins with a fall seeded crop and ends with an interseeded cover crop that will be in the field in fall.
So if erosion cannot be calculated, or if some start year and length can't be selected as rotation settings, one of those two situations may apply.